You’ll think this article is clickbait, but it’s not. I’ve built a fully-functional static serverless WordPress solution on AWS, with Global CDN, WAF and A-Grade SSL for literally one cent per day. It’s fast, resilient, scalable, and unlike many WordPress sites, not susceptible to brute-force login attacks.
What’s more: You can do it too. It’s wrapped up in an open-source Terraform module and I’m kind of hoping it’ll break the internet with its accessible simplicity. You can set this up from a standing start in less than 30 minutes.
What does Serverless Static WordPress do?
Serverless Static WordPress is a Community Terraform Module from TechToSpeech that needs nothing more than a registered domain name with its DNS pointed at AWS.
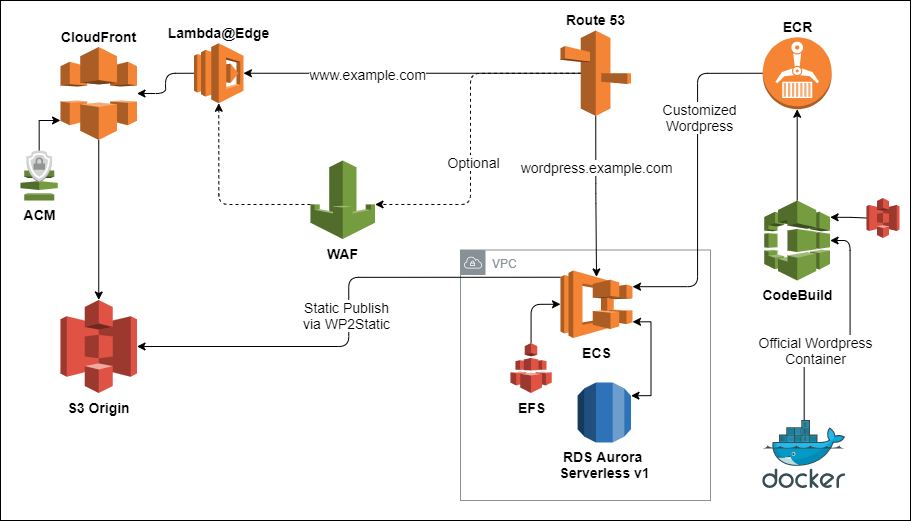
It creates a complete infrastructure framework that allows you to launch a temporary, transient WordPress container. You then log in and customise it like any WordPress site, and finally publish it as a static site fronted by a global CloudFront CDN and S3 Origin. When you’re done you shut down the WordPress container and it costs you almost nothing.
The emphasis is on extremely minimal configuration as the majority of everything you’d need is pre-installed and pre-configured in line with industry best practices and highly efficient running costs.
Have an existing site that you’d like to convert to Serverless Static WordPress? No problem.
There’s a lot to get through here so this story is broken up into two different articles; The Short Version and The Long Version. Pick the first one if you want to grab this thing and get started immediately, and the second one if you want to know exactly how this solution works under the hood and learn about all of the work it took to put it together.
If you are familiar with AWS this will go a lot faster, but even if this is your first time The Short Version steps should get you up and running in no time.
The Short Version
For all of these steps we’ll use the example domain www.peter.cloud.
Step 0 – Create an AWS account.
Step 1 – The domain
In your AWS account, create a Route53 Hosted Zone for your domain name. Once created, this will display four DNS nameservers for your new website.
Go to wherever your domain name is registered (it could be AWS itself, or anywhere else), and update the DNS Servers to the four just created.
Step 2 – The tools and credentials
Ensure you have Terraform, AWS-CLI (with a user and credentials) and optionally (but preferably) Docker with the service started.
Step 3 – The code and the plan
Check the GitHub README for the project for extensive code examples to get set up and deploying quickly.
The module does _almost_ everything by itself, but there are a couple of extra resources specified here that’ll make it a completely hands-off end-to-end process. These are the parts that need docker installed and the AWS CLI configured properly with a default region and profile.
Terraform init, plan, and apply, then sit back and get a drink. The full end-to-end creation process here should take about 10 minutes. Unless you did something wrong, this should complete without errors – but just in case it does try running the plan and apply steps again.
Step 4 – Launch WordPress
What you did in Step 3 is create everything you need to launch WordPress and publish your static site – but it’s not launched yet. If you didn’t add the optional Terraform resource to trigger the CodeBuild job, you’ll need to head to the CodeBuild console in your chosen region and start the ‘-serverless-wordpress-docker-build’ job and wait for it to complete (it’ll take about 2 minutes).
Modify the ‘launch’ attribute of your module from 0 to 1, and then run ‘terraform apply’ again. WordPress will now launch. The first-time set-up will take roughly 5 minutes while the initial site is created, configured, and the necessary plugins are installed.
By default, your WordPress installation will become available at http://wordpress.yourdomain.com (Why no SSL for this part? Check The Long Version for details)
The default username is ‘supervisor’ and default password is ‘techtospeech.com’. You can either override these, along with the default subdomain, in the module’s configuration, or modify them after you log into WordPress. Please make sure you do!
Step 5 – Post and Publish
This is now a WordPress installation like any other. You can install most plugins (although any with explicit server-side functionality won’t work in a static site), any themes you like, and even import an existing site backup. SEO plugins like Yoast work just fine. If the site is idle for more than 5 minutes the backend database will pause (to save money), but simply refreshing the admin console will make it start up again after a few seconds of delay.
Whenever you want to stop the container, toggle the ‘launch’ attribute of your Terraform configuration back to 0 and re-run ‘terraform apply’. You can also manually scale the ECS Service to 0 tasks in the AWS console. A better method of one-tap launching and stopping the site will be coming in future! Stopping the container doesn’t lose any data – the database will be saved in the background, along with any files, images, plugins or themes you installed. Its state is perfectly preserved until the next time you launch it.
But – it is critically important that you remember to shut the container down when you’re done. Otherwise it’ll keep on running – it won’t cost you too much if it does but the whole point of this solution is to save money, not waste it! (Another future update will have an auto-shutdown-when-idle feature)
When you’re ready it’s time to publish. Check out the WP2Static plugin that has been automatically installed for you, along with the WP2Static S3 Addon. Leon Stafford is the creator of these plugins. He’s the open-source static WordPress guru without whom this project would not have a deployment mechanism. I talk more about Leon in The Long Version.
You can check out all of the WP2Static options you can tweak to configure your deployment, but the auto-setup has pre-filled everything you need to publish. Hit the ‘Generate Static Site’ button and periodically refresh the log to check on status. This will now crawl and rewrite every URL to a neat static version that then gets pushed directly into the S3 bucket backing the static version of the site.
This process can be as fast as 3-5 minutes or much longer if you have a larger site. We’re working on faster methods for these different steps (and help is gratefully received!) but at the moment the version bundled with this set-up is stable and reliable with a little patience.
Once the process completes…. You’re done! Head to the https version of your site (in this example, https://www.peter.cloud) and be amazed at how your website looks identical to how it did before, except now it’s serverless, static, cached with a Global CDN and won’t go down to some feeble DDoS probing or wp-login brute-forcing. In fact, try to go to https://www.peter.cloud/wp-admin – ha! Doesn’t exist!
Is it really only $0.01 a day?
Yes, but also no. It depends.
Consider the typical use case. You’re a nerdy tech person with a personal blogging site (and I am, check out petewilcock.com), you’ve got a few articles, you probably get between 50 and 200 hits a day. With that kind of traffic the site will run in its static form without any intervention for around $0.01 a day – completely legitimately.
On the other hand, if you’re a globally-popular massive content-generation business with thousands of articles and millions of hits a month… it’ll cost more. Your only variable cost with traffic is CloudFront distribution charges, and you can mitigate these by either getting a discount with a CloudFront Security Savings Bundle, or if you’re a particularly big player you can enquire about custom CloudFront pricing directly to AWS. WAF has some unavoidable fixed costs that completely falsify my clickbait title and will add at least $0.60 a day to running costs. But if you’re suspeptible enough to need the WAF, I’m guessing you can afford it.
As I run several static WordPress sites using this set-up, I’ve paid literally $1 a month for a Savings Bundle and that covers a lot of my usage. Previously I was running a T3 web hosting server with CPanel licencing that cost around $600 a year. Now it’s not a strictly fair comparison for a few reasons (this set-up doesn’t handle email at the moment for example – but look out for a future update!), but you start to get an idea of the difference between this and a ‘conventional’ hosting set-up for a basic website. Even other providers of ‘Static’ WordPress sites can’t compete with this, because they need a profit-margin and you don’t.
The only other costs to be aware of are the ECS Fargate container running costs that backs WordPress (and it runs in Spot mode so it’s very cheap), and the RDS Aurora Serverless v1 database that backs the WordPress database. This is actually the most expensive bit (and you guessed it, a future version will offer a cheaper alternative if you want to sacrifice the features and convenience), but you’re only charged for the time you’re actively modifying the site. As an example, if I’m editing the site for several hours, this might cost around $0.30. The key part is that the vast majority of the time when you’re not adding content, it costs practically nothing.
Troubleshooting
No set-up is ever perfect, so if you have any issues with the Terraform module please report them on our GitHub and we’ll take a look. Contributions are also welcome!
If you experience an issue with the WP2Static plugin, check out their issues page for common issues and solutions and the chances are anything you encounter can be tweaked to work as you’d like. You will be free to upgrade the plugin, or WordPress itself, whenever you like – but always take a backup first! I recommend UpdraftPlus as a great free WordPress backup plugin.
In Conclusion
Firstly another reminder. Don’t forget to turn off your WordPress container when you’re done!
This module is the culmination of many months of painful iterations both to get it working for myself, and then extensively bashing it into shape so I could publish it publicly without embarrassing myself. It leverages all of my experience of AWS since I started with it back in 2014 and compresses every element of DevOps and web development I’ve ever learned into a tight solution that can work for anybody. I hope it works for you!
To learn more about this mad journey, check out The Long Version article.
—
Pete Wilcock is a 9x AWS Certified DevOps Consultant, AWS Community Builder, and Technical Writer for TechToSpeech. If I’m not possibly losing my mind and definitely my social life buried in some project, you can find me on LinkedIn, Twitter, GitHub, or my personal site.